Remember, in Part 1 I asked you a question: “How do you run a Django application, Flask application, and Pyramid application under your freshly minted Web server without making a single change to the server to accommodate all those different Web frameworks?” Read on to find out the answer.
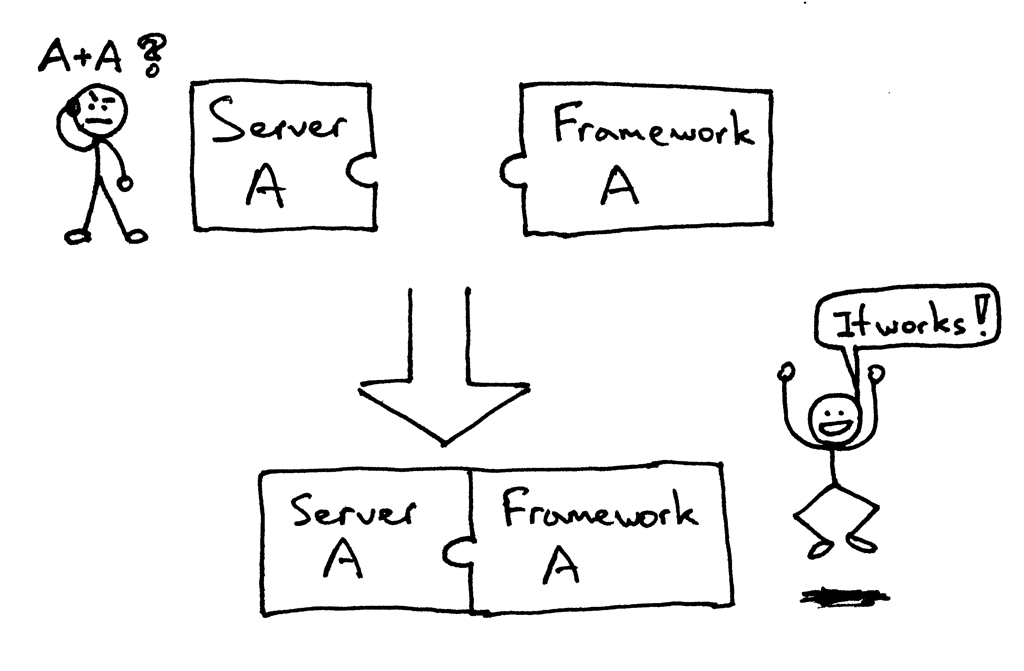
In the past, your choice of a Python Web framework would limit your choice of usable Web servers, and vice versa. If the framework and the server were designed to work together, then you were okay:
But you could have been faced (and maybe you were) with the following problem when trying to combine a server and a framework that weren’t designed to work together:
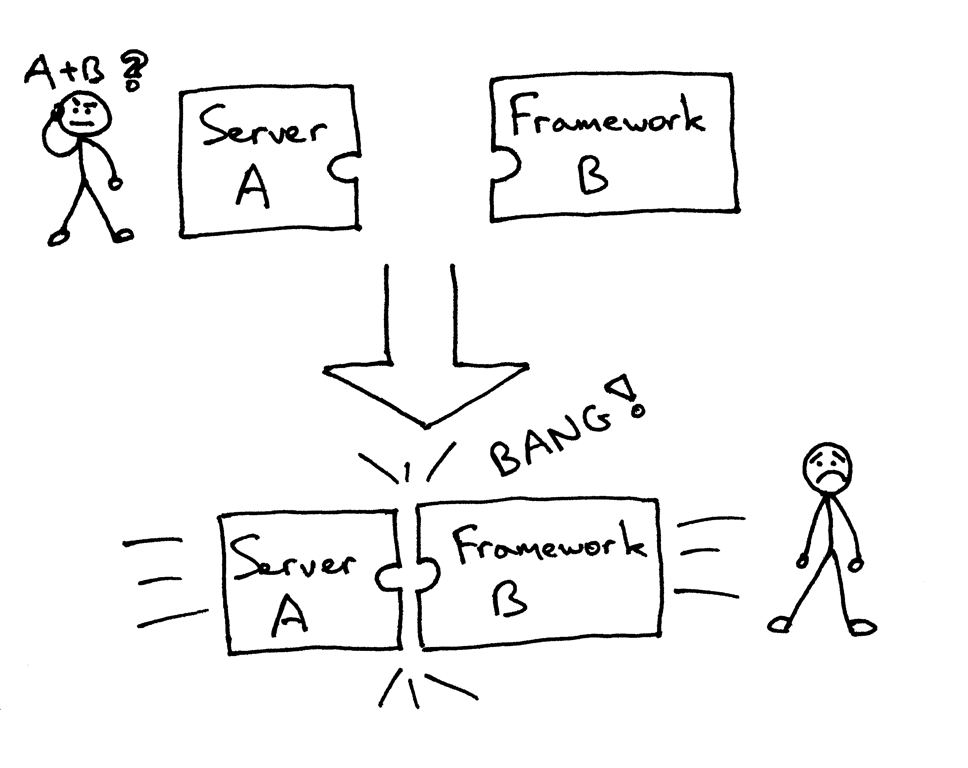
Basically you had to use what worked together and not what you might have wanted to use.
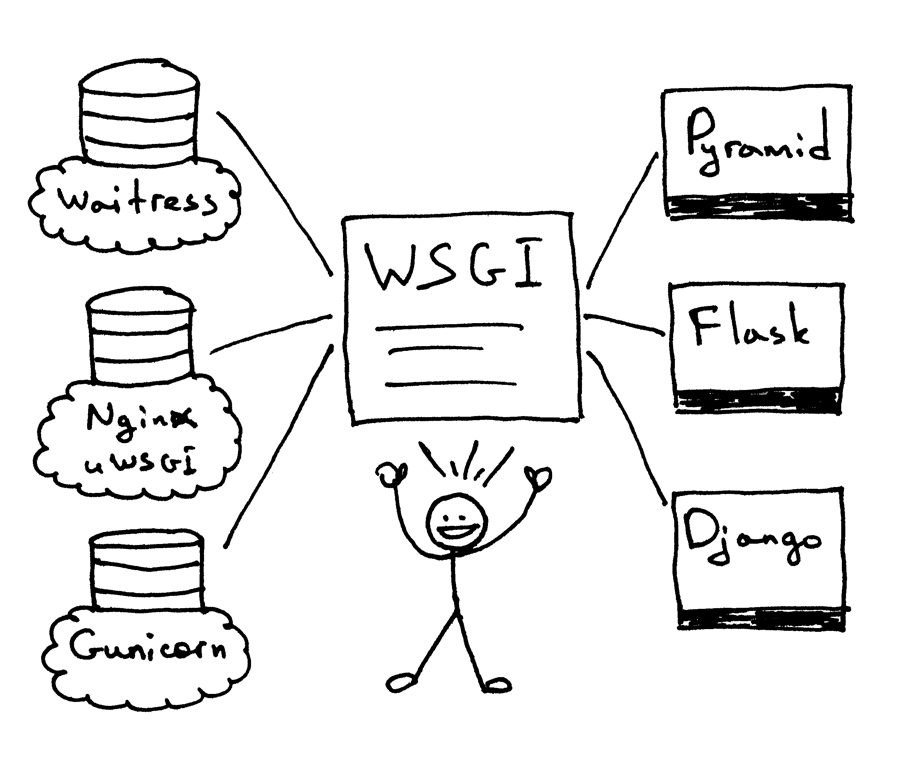
So, how do you then make sure that you can run your Web server with multiple Web frameworks without making code changes either to the Web server or to the Web frameworks? And the answer to that problem became the Python Web Server Gateway Interface (or WSGI for short, pronounced “wizgy”).

WSGI allowed developers to separate choice of a Web framework from choice of a Web server. Now you can actually mix and match Web servers and Web frameworks and choose a pairing that suits your needs. You can run Django, Flask, or Pyramid, for example, with Gunicorn or Nginx/uWSGI or Waitress. Real mix and match, thanks to the WSGI support in both servers and frameworks:
So, WSGI is the answer to the question I asked you in Part 1 and repeated at the beginning of this article. Your Web server must implement the server portion of a WSGI interface and all modern Python Web Frameworks already implement the framework side of the WSGI interface, which allows you to use them with your Web server without ever modifying your server’s code to accommodate a particular Web framework.
Now you know that WSGI support by Web servers and Web frameworks allows you to choose a pairing that suits you, but it is also beneficial to server and framework developers because they can focus on their preferred area of specialization and not step on each other’s toes. Other languages have similar interfaces too: Java, for example, has Servlet API and Ruby has Rack.
It’s all good, but I bet you are saying: “Show me the code!” Okay, take a look at this pretty minimalistic WSGI server implementation:
# Tested with Python 3.7+ (Mac OS X)
import io
import socket
import sys


class WSGIServer(object):

    address_family = socket.AF_INET
    socket_type = socket.SOCK_STREAM
    request_queue_size = 1

    def __init__(self, server_address):
        # Create a listening socket
        self.listen_socket = listen_socket = socket.socket(
            self.address_family,
            self.socket_type
        )
        # Allow to reuse the same address
        listen_socket.setsockopt(socket.SOL_SOCKET, socket.SO_REUSEADDR, 1)
        # Bind
        listen_socket.bind(server_address)
        # Activate
        listen_socket.listen(self.request_queue_size)
        # Get server host name and port
        host, port = self.listen_socket.getsockname()[:2]
        self.server_name = socket.getfqdn(host)
        self.server_port = port
        # Return headers set by Web framework/Web application
        self.headers_set = []

    def set_app(self, application):
        self.application = application

    def serve_forever(self):
        listen_socket = self.listen_socket
        while True:
            # New client connection
            self.client_connection, client_address = listen_socket.accept()
            # Handle one request and close the client connection. Then
            # loop over to wait for another client connection
            self.handle_one_request()

    def handle_one_request(self):
        request_data = self.client_connection.recv(1024)
        self.request_data = request_data = request_data.decode('utf-8')
        # Print formatted request data a la 'curl -v'
        print(''.join(
            f'< {line}\n' for line in request_data.splitlines()
        ))

        self.parse_request(request_data)

        # Construct environment dictionary using request data
        env = self.get_environ()

        # It's time to call our application callable and get
        # back a result that will become HTTP response body
        result = self.application(env, self.start_response)

        # Construct a response and send it back to the client
        self.finish_response(result)

    def parse_request(self, text):
        request_line = text.splitlines()[0]
        request_line = request_line.rstrip('\r\n')
        # Break down the request line into components
        (self.request_method,  # GET
         self.path,            # /hello
         self.request_version  # HTTP/1.1
         ) = request_line.split()

    def get_environ(self):
        env = {}
        # The following code snippet does not follow PEP8 conventions
        # but it's formatted the way it is for demonstration purposes
        # to emphasize the required variables and their values
        #
        # Required WSGI variables
        env['wsgi.version']      = (1, 0)
        env['wsgi.url_scheme']   = 'http'
        env['wsgi.input']        = io.StringIO(self.request_data)
        env['wsgi.errors']       = sys.stderr
        env['wsgi.multithread']  = False
        env['wsgi.multiprocess'] = False
        env['wsgi.run_once']     = False
        # Required CGI variables
        env['REQUEST_METHOD']    = self.request_method    # GET
        env['PATH_INFO']         = self.path              # /hello
        env['SERVER_NAME']       = self.server_name       # localhost
        env['SERVER_PORT']       = str(self.server_port)  # 8888
        return env

    def start_response(self, status, response_headers, exc_info=None):
        # Add necessary server headers
        server_headers = [
            ('Date', 'Mon, 15 Jul 2019 5:54:48 GMT'),
            ('Server', 'WSGIServer 0.2'),
        ]
        self.headers_set = [status, response_headers + server_headers]
        # To adhere to WSGI specification the start_response must return
        # a 'write' callable. We simplicity's sake we'll ignore that detail
        # for now.
        # return self.finish_response

    def finish_response(self, result):
        try:
            status, response_headers = self.headers_set
            response = f'HTTP/1.1 {status}\r\n'
            for header in response_headers:
                response += '{0}: {1}\r\n'.format(*header)
            response += '\r\n'
            for data in result:
                response += data.decode('utf-8')
            # Print formatted response data a la 'curl -v'
            print(''.join(
                f'> {line}\n' for line in response.splitlines()
            ))
            response_bytes = response.encode()
            self.client_connection.sendall(response_bytes)
        finally:
            self.client_connection.close()


SERVER_ADDRESS = (HOST, PORT) = '', 8888


def make_server(server_address, application):
    server = WSGIServer(server_address)
    server.set_app(application)
    return server


if __name__ == '__main__':
    if len(sys.argv) < 2:
        sys.exit('Provide a WSGI application object as module:callable')
    app_path = sys.argv[1]
    module, application = app_path.split(':')
    module = __import__(module)
    application = getattr(module, application)
    httpd = make_server(SERVER_ADDRESS, application)
    print(f'WSGIServer: Serving HTTP on port {PORT} ...\n')
    httpd.serve_forever()
It’s definitely bigger than the server code in Part 1, but it’s also small enough (just under 150 lines) for you to understand without getting bogged down in details. The above server also does more - it can run your basic Web application written with your beloved Web framework, be it Pyramid, Flask, Django, or some other Python WSGI framework.
Don’t believe me? Try it and see for yourself. Save the above code as webserver2.py or download it directly from GitHub. If you try to run it without any parameters it’s going to complain and exit.
$ python webserver2.py
Provide a WSGI application object as module:callable
It really wants to serve your Web application and that’s where the fun begins. To run the server the only thing you need installed is Python (Python 3.7+, to be exact). But to run applications written with Pyramid, Flask, and Django you need to install those frameworks first. Let’s install all three of them. My preferred method is by using venv (it is available by default in Python 3.3 and later). Just follow the steps below to create and activate a virtual environment and then install all three Web frameworks.
$ python3 -m venv lsbaws
$ ls lsbaws
bin   include   lib   pyvenv.cfg
$ source lsbaws/bin/activate
(lsbaws) $ pip install -U pip
(lsbaws) $ pip install pyramid
(lsbaws) $ pip install flask
(lsbaws) $ pip install django
At this point you need to create a Web application. Let’s start with Pyramid first. Save the following code as pyramidapp.py to the same directory where you saved webserver2.py or download the file directly from GitHub:
from pyramid.config import Configurator
from pyramid.response import Response


def hello_world(request):
    return Response(
        'Hello world from Pyramid!\n',
        content_type='text/plain',
    )

config = Configurator()
config.add_route('hello', '/hello')
config.add_view(hello_world, route_name='hello')
app = config.make_wsgi_app()
Now you’re ready to serve your Pyramid application with your very own Web server:
(lsbaws) $ python webserver2.py pyramidapp:app
WSGIServer: Serving HTTP on port 8888 ...
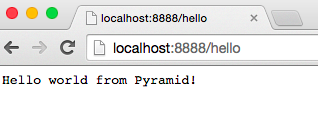
You just told your server to load the ‘app’ callable from the python module ‘pyramidapp’ Your server is now ready to take requests and forward them to your Pyramid application. The application only handles one route now: the /hello route. Type http://localhost:8888/hello address into your browser, press Enter, and observe the result:
You can also test the server on the command line using the ‘curl’ utility:
$ curl -v http://localhost:8888/hello
...
Check what the server and curl prints to standard output.
Now onto Flask. Let’s follow the same steps.
from flask import Flask
from flask import Response
flask_app = Flask('flaskapp')


@flask_app.route('/hello')
def hello_world():
    return Response(
        'Hello world from Flask!\n',
        mimetype='text/plain'
    )

app = flask_app.wsgi_app
Save the above code as flaskapp.py or download it from GitHub and run the server as:
(lsbaws) $ python webserver2.py flaskapp:app
WSGIServer: Serving HTTP on port 8888 ...
Now type in the http://localhost:8888/hello into your browser and press Enter:
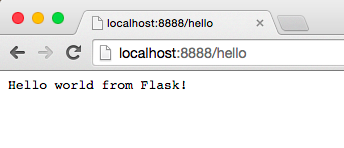
Again, try ‘curl’ and see for yourself that the server returns a message generated by the Flask application:
$ curl -v http://localhost:8888/hello
...
Can the server also handle a Django application? Try it out! It’s a little bit more involved, though, and I would recommend cloning the whole repo and use djangoapp.py, which is part of the GitHub repository. Here is the source code which basically adds the Django ‘helloworld’ project (pre-created using Django’s django-admin.py startproject command) to the current Python path and then imports the project’s WSGI application.
import sys
sys.path.insert(0, './helloworld')
from helloworld import wsgi


app = wsgi.application
Save the above code as djangoapp.py and run the Django application with your Web server:
(lsbaws) $ python webserver2.py djangoapp:app
WSGIServer: Serving HTTP on port 8888 ...
Type in the following address and press Enter:
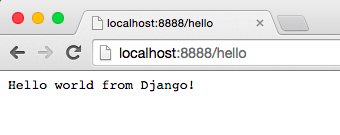
And as you’ve already done a couple of times before, you can test it on the command line, too, and confirm that it’s the Django application that handles your requests this time around:
$ curl -v http://localhost:8888/hello
...
Did you try it? Did you make sure the server works with those three frameworks? If not, then please do so. Reading is important, but this series is about rebuilding and that means you need to get your hands dirty. Go and try it. I will wait for you, don’t worry. No seriously, you must try it and, better yet, retype everything yourself and make sure that it works as expected.
Okay, you’ve experienced the power of WSGI: it allows you to mix and match your Web servers and Web frameworks. WSGI provides a minimal interface between Python Web servers and Python Web Frameworks. It’s very simple and it’s easy to implement on both the server and the framework side. The following code snippet shows the server and the framework side of the interface:
def run_application(application):
    """Server code."""
    # This is where an application/framework stores
    # an HTTP status and HTTP response headers for the server
    # to transmit to the client
    headers_set = []
    # Environment dictionary with WSGI/CGI variables
    environ = {}

    def start_response(status, response_headers, exc_info=None):
        headers_set[:] = [status, response_headers]

    # Server invokes the ‘application' callable and gets back the
    # response body
    result = application(environ, start_response)
    # Server builds an HTTP response and transmits it to the client
    ...

def app(environ, start_response):
    """A barebones WSGI app."""
    start_response('200 OK', [('Content-Type', 'text/plain')])
    return [b'Hello world!']

run_application(app)
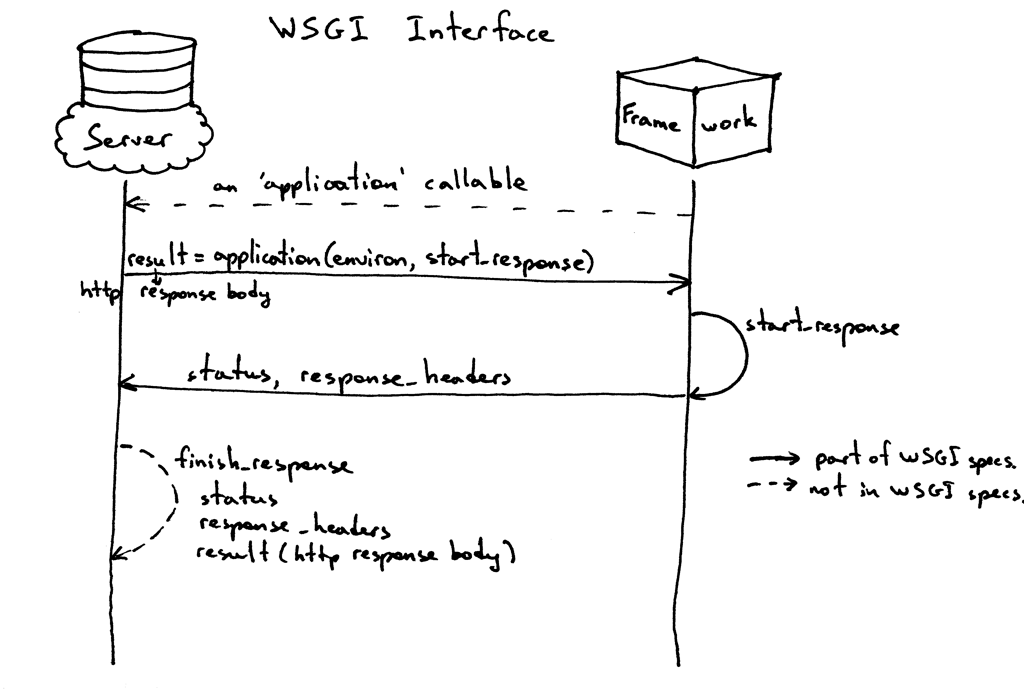
Here is how it works:
- The framework provides an ‘application’ callable (The WSGI specification doesn’t prescribe how that should be implemented)
- The server invokes the ‘application’ callable for each request it receives from an HTTP client. It passes a dictionary ‘environ’ containing WSGI/CGI variables and a ‘start_response’ callable as arguments to the ‘application’ callable.
- The framework/application generates an HTTP status and HTTP response headers and passes them to the ‘start_response’ callable for the server to store them. The framework/application also returns a response body.
- The server combines the status, the response headers, and the response body into an HTTP response and transmits it to the client (This step is not part of the specification but it’s the next logical step in the flow and I added it for clarity)
And here is a visual representation of the interface:
So far, you’ve seen the Pyramid, Flask, and Django Web applications and you’ve seen the server code that implements the server side of the WSGI specification. You’ve even seen the barebones WSGI application code snippet that doesn’t use any framework.
The thing is that when you write a Web application using one of those frameworks you work at a higher level and don’t work with WSGI directly, but I know you’re curious about the framework side of the WSGI interface, too because you’re reading this article. So, let’s create a minimalistic WSGI Web application/Web framework without using Pyramid, Flask, or Django and run it with your server:
def app(environ, start_response):
    """A barebones WSGI application.

    This is a starting point for your own Web framework :)
    """
    status = '200 OK'
    response_headers = [('Content-Type', 'text/plain')]
    start_response(status, response_headers)
    return [b'Hello world from a simple WSGI application!\n']
Again, save the above code in wsgiapp.py file or download it from GitHub directly and run the application under your Web server as:
(lsbaws) $ python webserver2.py wsgiapp:app
WSGIServer: Serving HTTP on port 8888 ...
Type in the following address and press Enter. This is the result you should see:
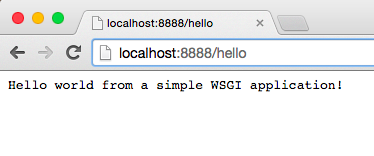
You just wrote your very own minimalistic WSGI Web framework while learning about how to create a Web server! Outrageous.
Now, let’s get back to what the server transmits to the client. Here is the HTTP response the server generates when you call your Pyramid application using an HTTP client:
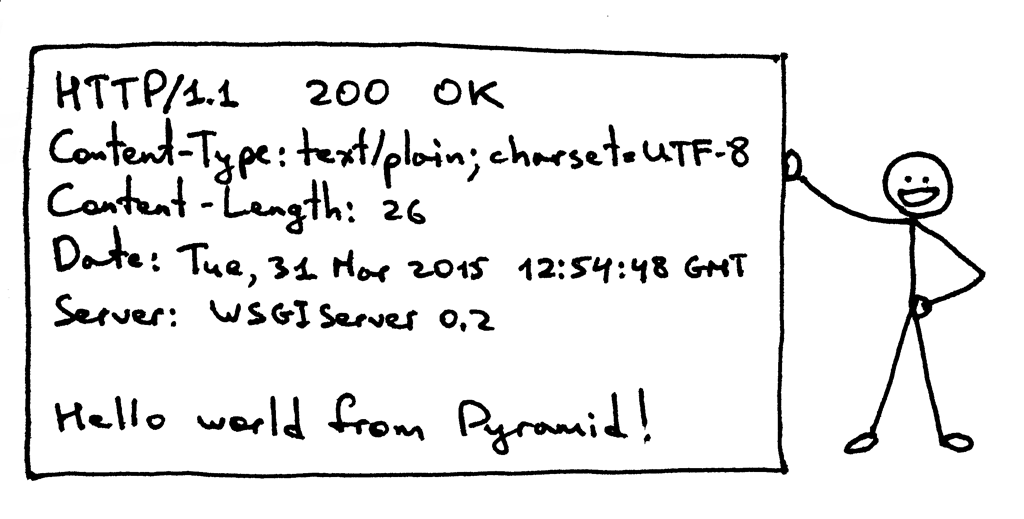
The response has some familiar parts that you saw in Part 1 but it also has something new. It has, for example, four HTTP headers that you haven’t seen before: Content-Type, Content-Length, Date, and Server. Those are the headers that a response from a Web server generally should have. None of them are strictly required, though. The purpose of the headers is to transmit additional information about the HTTP request/response.
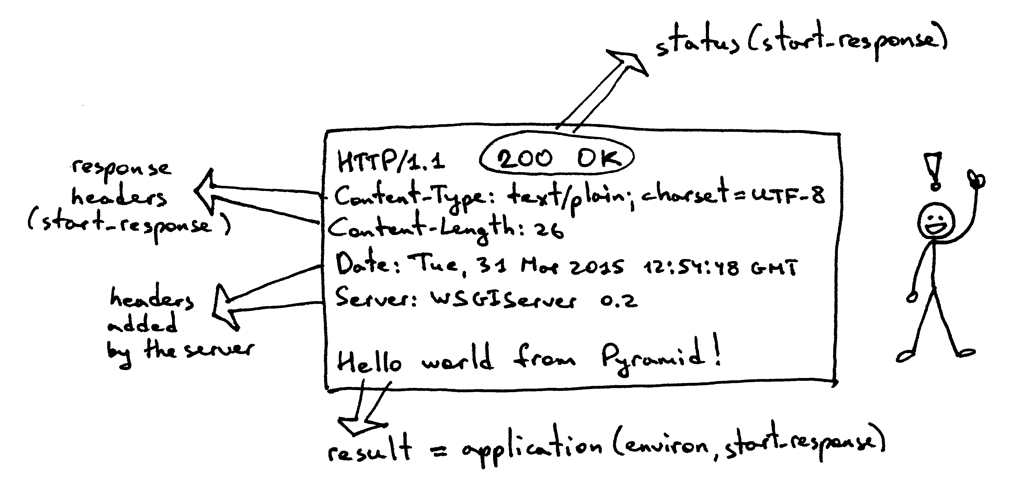
Now that you know more about the WSGI interface, here is the same HTTP response with some more information about what parts produced it:
I haven’t said anything about the ‘environ’ dictionary yet, but basically it’s a Python dictionary that must contain certain WSGI and CGI variables prescribed by the WSGI specification. The server takes the values for the dictionary from the HTTP request after parsing the request. This is what the contents of the dictionary look like:
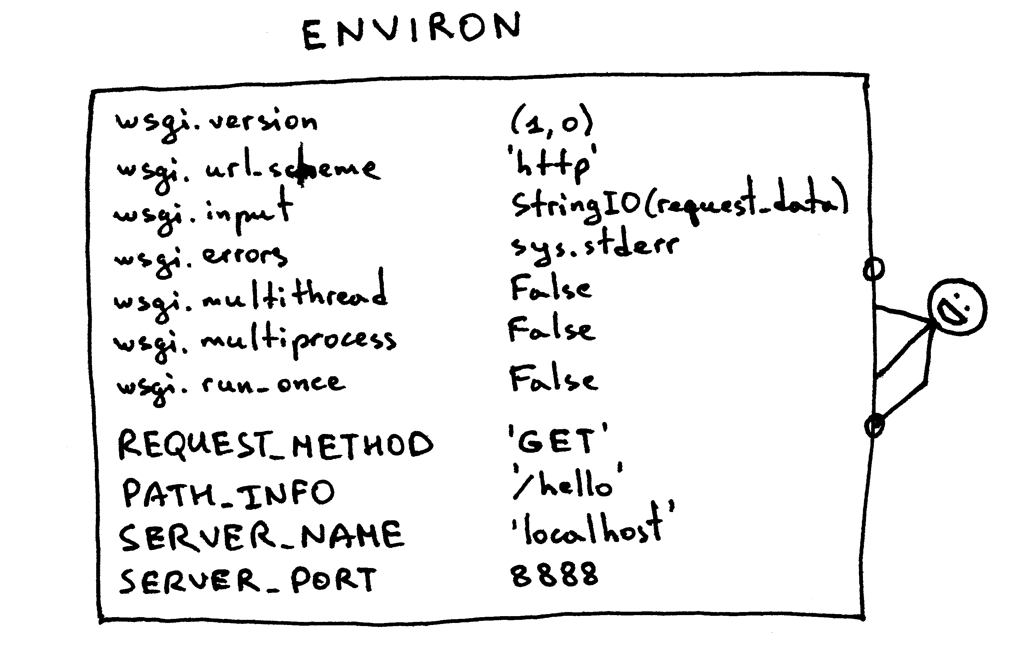
A Web framework uses the information from that dictionary to decide which view to use based on the specified route, request method etc., where to read the request body from and where to write errors, if any.
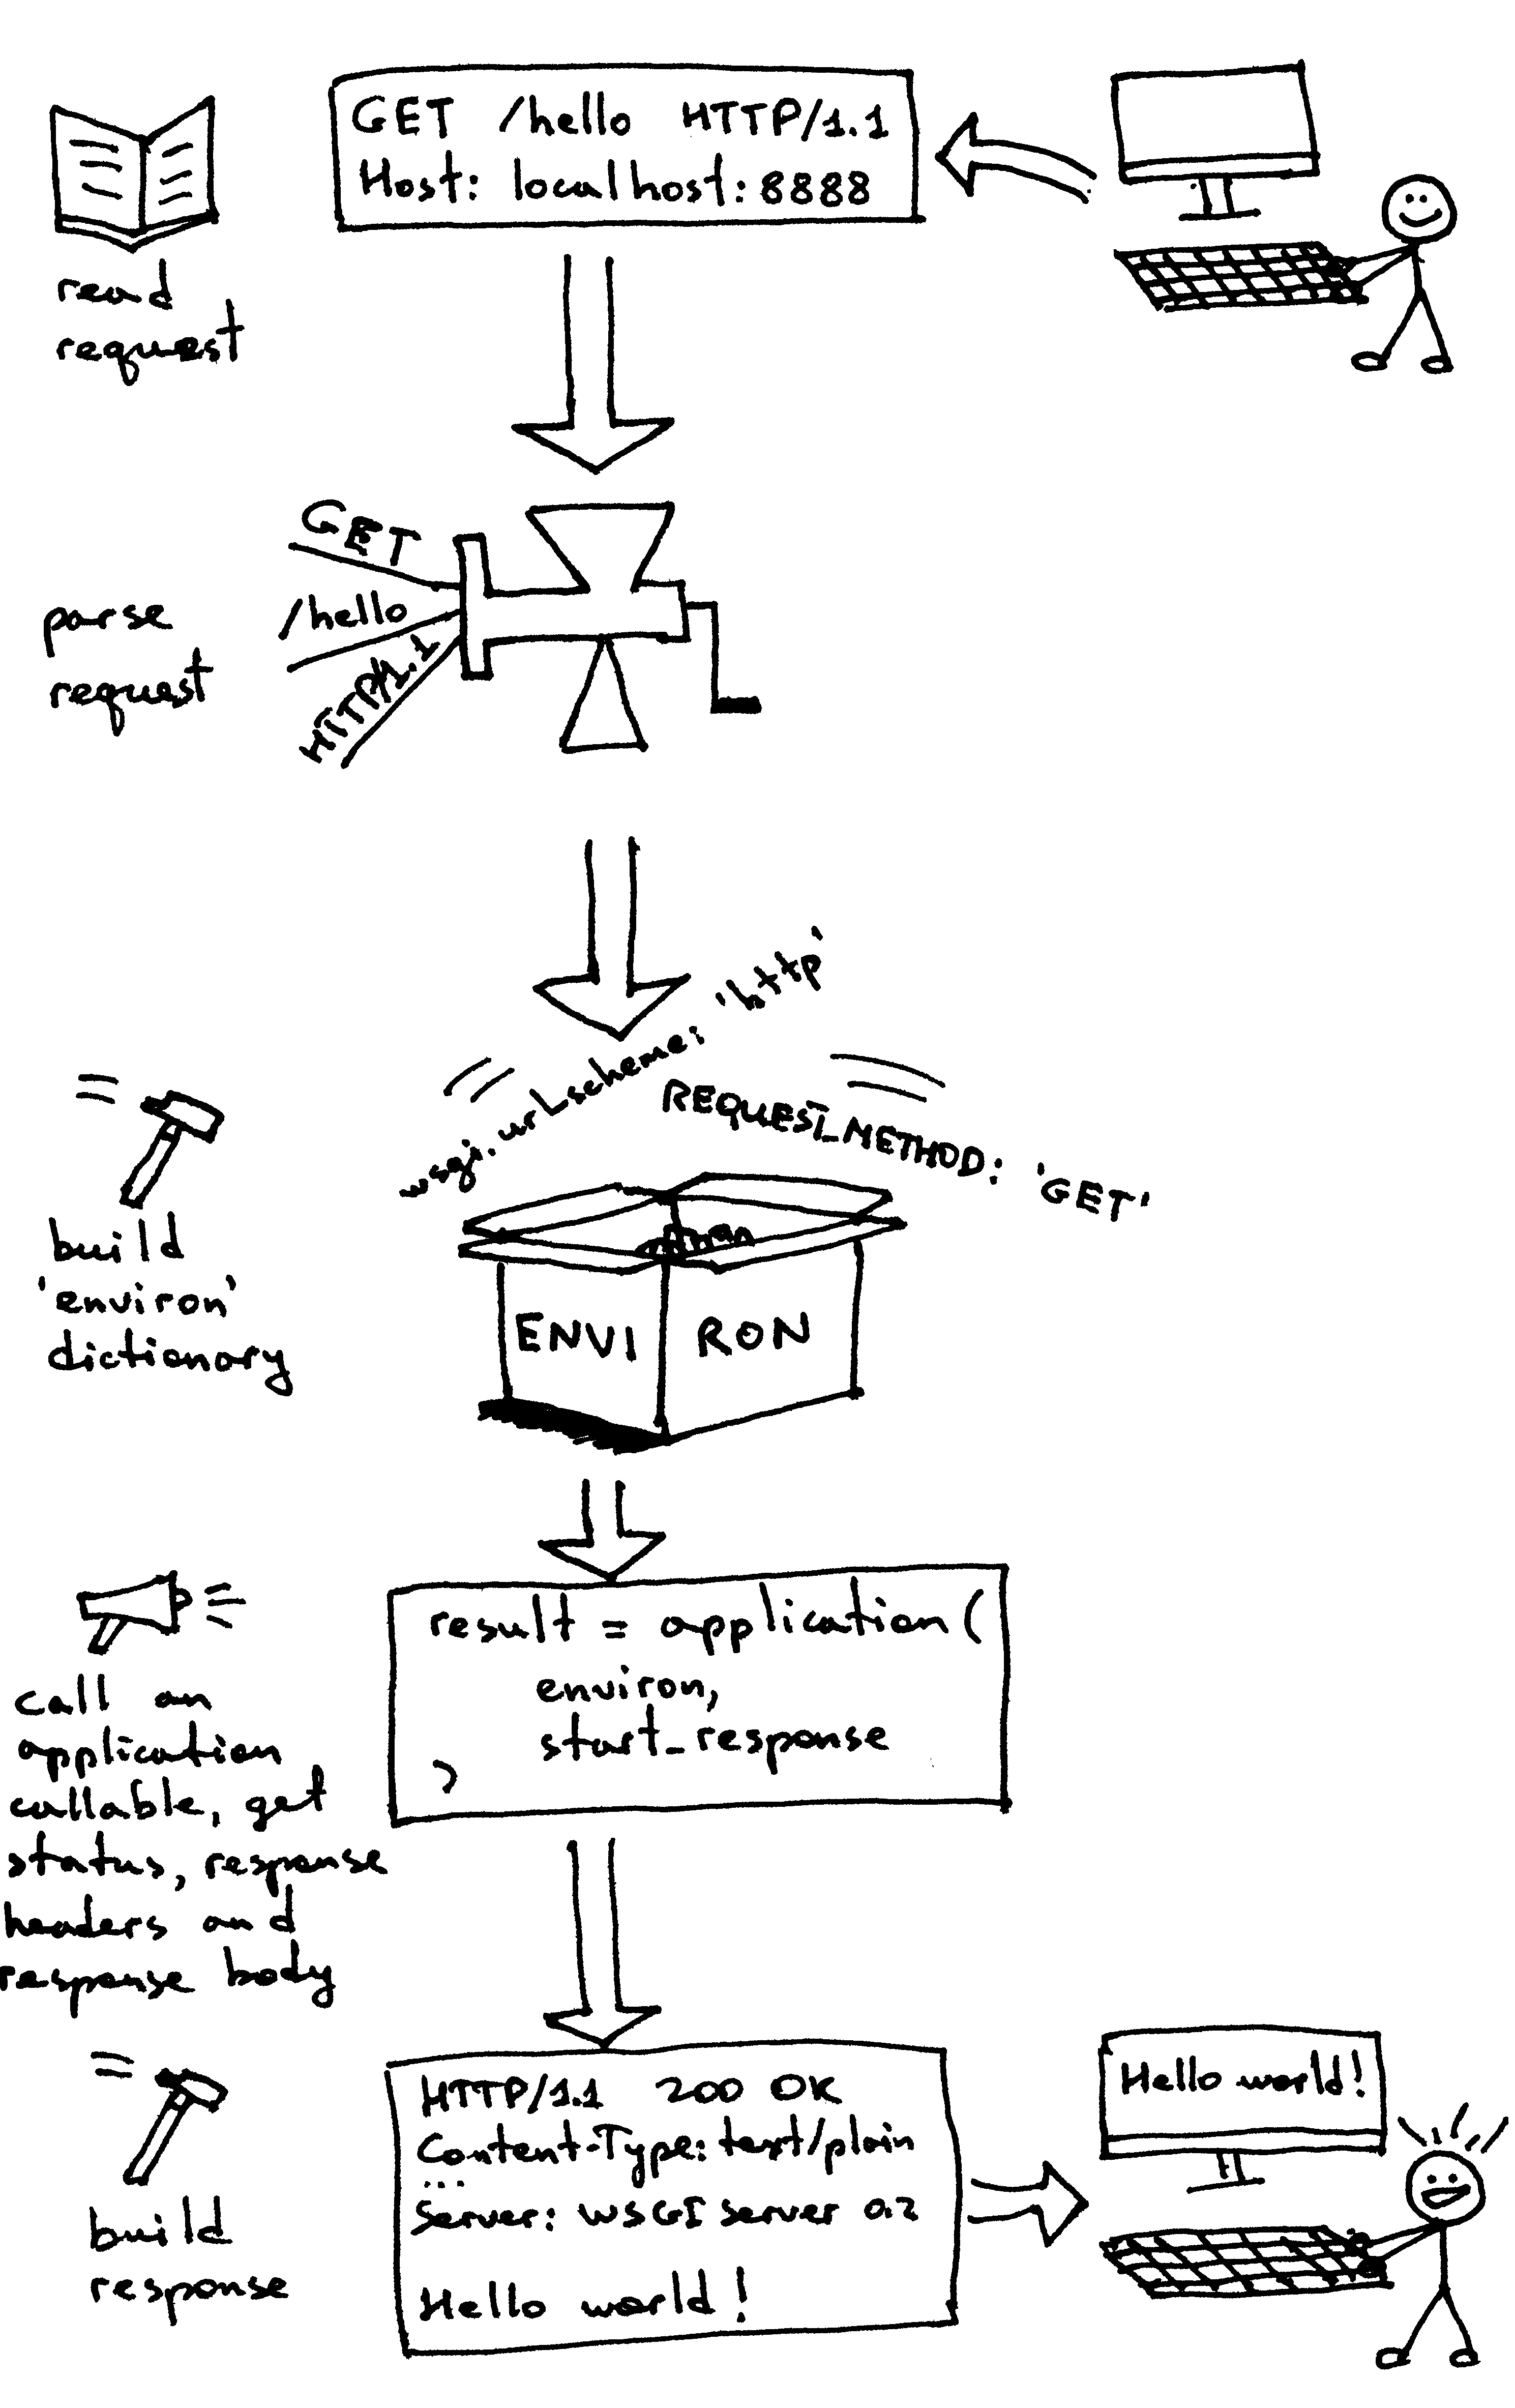
By now you’ve created your own WSGI Web server and you’ve made Web applications written with different Web frameworks. And, you’ve also created your barebones Web application/Web framework along the way. It’s been a heck of a journey. Let’s recap what your WSGI Web server has to do to serve requests aimed at a WSGI application:
- First, the server starts and loads an ‘application’ callable provided by your Web framework/application
- Then, the server reads a request
- Then, the server parses it
- Then, it builds an ‘environ’ dictionary using the request data
- Then, it calls the ‘application’ callable with the ‘environ’ dictionary and a ‘start_response’ callable as parameters and gets back a response body.
- Then, the server constructs an HTTP response using the data returned by the call to the ‘application’ object and the status and response headers set by the ‘start_response’ callable.
- And finally, the server transmits the HTTP response back to the client
That’s about all there is to it. You now have a working WSGI server that can serve basic Web applications written with WSGI compliant Web frameworks like Django, Flask, Pyramid, or your very own WSGI framework. The best part is that the server can be used with multiple Web frameworks without any changes to the server code base. Not bad at all.
Before you go, here is another question for you to think about, “How do you make your server handle more than one request at a time?”
Stay tuned and I will show you a way to do that in Part 3. Cheers!
Resources used in preparation for this article:
-
Unix Network Programming, Volume 1: The Sockets Networking API (3rd Edition)
-
Advanced Programming in the UNIX Environment, 3rd Edition
-
The Linux Programming Interface: A Linux and UNIX System Programming Handbook
Get the edge and stay sharp. Subscribe to Beyond Basics for free and get new posts without missing a beat!
All articles in this series:
Comments
comments powered by Disqus